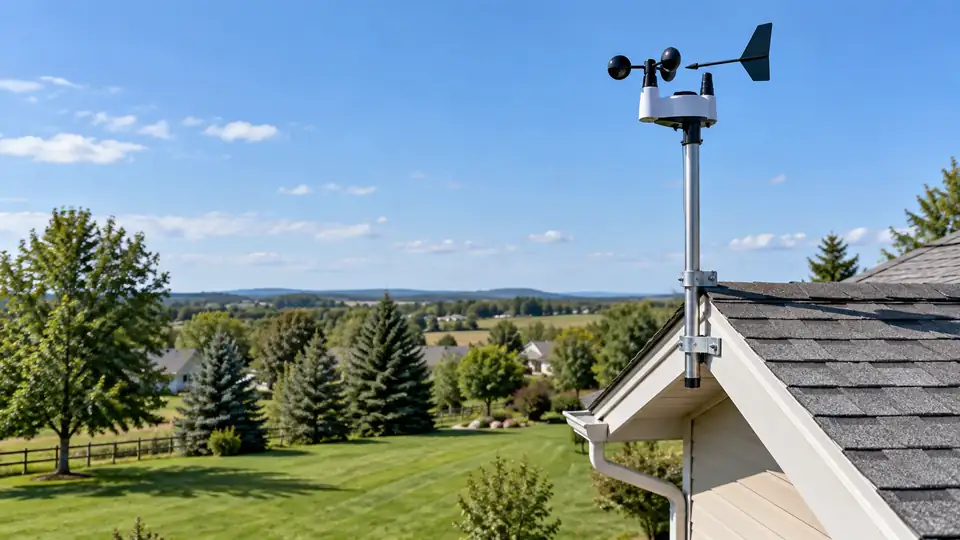
An anemometer needs a clear, steady flow of air. A fence, chimney, roof edge, tree, or nearby wall can slow the wind, deflect it, or create swirling eddies that make the reading look strangely low or erratic. The best location is usually an elevated, stable mounting point with open exposure in as many directions as the property allows, while following the mounting instructions for the exact weather station.
For a home installation, where to place a weather station anemometer depends mainly on wind exposure, mounting height, nearby obstructions, maintenance access, and whether the anemometer is attached to an integrated sensor array. A high point can improve wind readings while creating compromises for the rain gauge or temperature sensor mounted beside it.
What Makes a Good Anemometer Location?
An anemometer measures wind at the sensor itself. It does not know whether that air has just passed over a roof, squeezed between two buildings, or curled around a tree. The sensor may be operating perfectly while reporting airflow that is unrepresentative of the surrounding area.
Look for a site with these characteristics:
- Open airflow from the prevailing wind directions.
- A rigid mast or mounting point that does not sway or vibrate.
- Clear separation from walls, fences, trees, chimneys, vents, and roof edges.
- Enough height to rise above nearby obstructions where practical.
- Safe access for inspection and cleaning.
- A sensor-to-console or sensor-to-gateway connection that remains reliable.
Picture two common installations. An anemometer mounted beside a tall privacy fence may report calm conditions while the tree canopy beyond it is moving. A second sensor mounted on a clear mast may show stronger gusts because it is receiving unobstructed airflow. Neither reading automatically proves that the other instrument is faulty. The locations are sampling different air.
Height Matters, but Higher Is Not Always Better
Wind speed usually changes with height above the ground because friction from the ground, vegetation, buildings, and other surfaces slows and distorts airflow. A sensor placed low in a backyard can therefore record less wind than a sensor exposed above nearby obstacles.
Formal meteorological observations commonly use standardized exposure and height so readings from different stations can be compared. A residential weather station rarely has a perfectly open site, and reproducing a formal observing location may require a tall mast, substantial clearance, and more maintenance than a homeowner wants to manage.
A practical approach is to mount the anemometer as high and openly as safety, stability, local rules, and the equipment allow. Avoid treating a particular height as a universal requirement. The correct mounting height depends on the sensor design, the surrounding terrain, the purpose of the observations, and the manufacturer’s instructions.
For example, a low mast in a broad open yard may provide cleaner airflow than a taller mast tucked beside a two-story house. A sensor on a short pole near a row of mature trees may still experience severe turbulence, while a slightly lower location on the windward side of an open property may behave more consistently.
Keep the Anemometer Away From Wind Obstructions
Buildings and structures alter wind in several ways. They can block airflow, accelerate it around corners, deflect its direction, and generate turbulence behind rooflines and walls. Trees and shrubs create similar problems, with the added complication that their shape changes as leaves grow, branches move, and foliage becomes wet.
| Obstruction | Possible effect on the anemometer | Practical response |
|---|---|---|
| House wall | Shielded or deflected wind, especially near corners | Move the sensor farther into open exposure or above the disturbed airflow where practical |
| Roof edge | Accelerated or turbulent airflow over the roof | Use a stable mast that places the sensor clear of the roof geometry, if the structure permits |
| Fence | Reduced wind speed and swirling flow on the sheltered side | Avoid placing the sensor immediately beside or behind the fence |
| Trees and shrubs | Shielding, turbulence, and seasonal changes in exposure | Choose the most open sector available and account for future growth |
| Chimney, vent, or rooftop equipment | Localized turbulence and possible heat effects for nearby sensors | Keep the anemometer away from the disturbed air and exhaust path |
A fence may look harmless from the ground, yet the sheltered side can produce a noticeably different wind reading from the open side. Likewise, a chimney does not need to be directly beside the cups or propeller to affect airflow. The wake can extend beyond the obstruction, especially in gusty conditions.
Do not judge a location from a single calm afternoon. Walk around the property on a breezy day and watch how leaves, flags, tall grass, and loose objects respond. These observations cannot replace a formal exposure assessment, but they can reveal that one corner of the yard is consistently sheltered or turbulent.
Roof Mounting: Excellent Exposure With Real Compromises
A roof can provide height and broad exposure, which often makes it attractive for wind measurement. It can also produce complicated airflow. Wind moving over a ridge, parapet, eave, or steep roof surface may speed up, separate from the surface, and become turbulent before reaching the anemometer.
A rooftop sensor may therefore record stronger or more variable wind than a sensor at ground level without either reading being universally correct. The rooftop reading describes the airflow at that exposed mounting point. A backyard sensor describes conditions closer to the ground.
Roof heat is a larger concern for temperature sensors than for the anemometer itself, but an integrated array can place several instruments on the same mount. A roof location that gives the anemometer good exposure may leave the temperature sensor near heated roofing or put the rain collector where runoff and splash can interfere.
Maintenance and safety matter just as much as exposure. Roof access can become slippery, awkward, or hazardous during wind, rain, ice, or hot weather. Avoid installing near overhead electrical conductors, and follow the station manufacturer’s mounting instructions along with applicable local requirements. Difficult roof, mast, structural, or electrical work may call for qualified assistance.
Integrated Weather Stations Require a Placement Compromise
Many personal weather stations combine the anemometer, wind vane, rain gauge, temperature sensor, humidity sensor, and sometimes solar or UV sensors on one outdoor assembly. That arrangement simplifies installation, but the sensors do not all prefer identical surroundings.
- Anemometer: needs open, undisturbed airflow.
- Wind vane: needs enough clearance to respond to the actual wind direction rather than airflow redirected by a nearby object.
- Rain gauge: needs exposure away from overhanging branches, roof runoff, splash, and debris.
- Temperature and humidity sensors: need representative air exposure, shade or shielding from direct solar heating, and separation from hot surfaces and exhaust.
Raising an all-in-one array may improve the wind measurement while making the temperature reading more vulnerable to sun-heated mounting hardware or placing the rain collector in a difficult-to-reach position. Lowering it may simplify maintenance and improve access while leaving the anemometer in the wake of a house or tree.
Suppose an integrated array is mounted on a pole above an open lawn, but the pole sits beside a tall garage. The wind cups may receive clean flow from one direction and blocked flow from another. Moving the complete array to an open corner could help the anemometer, yet the new location might be farther from the console or gateway. This is a real installation trade-off, not a sign that one sensor has a perfect position waiting somewhere nearby.
Choose a Mount That Stays Rigid
An anemometer must move because of the wind, not because its support is wobbling. A flexible pole, loose clamp, unstable tripod, or vibrating bracket can introduce movement that affects the wind vane and may complicate interpretation of gust readings.
Use mounting hardware that matches the sensor’s pole diameter, clamp style, and mounting pattern. These details vary among stations, so a generic bracket is not automatically compatible. Tighten fasteners according to the equipment instructions without crushing plastic housings or deforming the mount.
Check the mast from several angles after installation. It should remain upright, and the cups or propeller should rotate freely without contacting the mast, cable, bracket, or nearby vegetation. A wind vane should turn smoothly and settle without catching. Do not add oil or lubricant unless the manufacturer specifically permits it, since lubricant can attract dust or interfere with components.
Wireless Communication Still Affects Placement
A location with excellent wind exposure is useful only if the outdoor sensor can communicate reliably with its console or gateway. The sensor-to-console link is separate from Wi-Fi. A station may send readings successfully to a local display while the display has no Internet connection, or the console may connect to Wi-Fi while the outdoor sensor link remains unreliable.
Before finalizing a tall mast or roof installation, check the model’s setup guidance and test communication from the intended sensor location if the equipment allows it. Walls, floors, metal siding, reinforced construction, terrain, trees, and distance can affect the radio link. An advertised transmission range is a stated specification, not a guarantee for every property.
A sensor mounted at the far end of a yard may have cleaner airflow but a weaker connection than one positioned closer to the house. If readings become stale or intermittent after relocation, inspect power, battery condition, pairing, obstruction, and distance before assuming the anemometer itself has failed.
How to Check the Finished Installation
After mounting the sensor, perform a physical and observational check before treating the placement as complete:
- Confirm that the mast, bracket, and fasteners are stable.
- Check that the anemometer spins or responds freely without rubbing.
- Make sure the wind vane moves without catching on the mount or cable.
- Look around the sensor from its actual height, not only from ground level, for nearby walls, branches, roof edges, and other obstructions.
- Verify that readings reach the console or gateway without repeated dropouts.
- Compare wind direction and speed with visible local conditions over several breezy periods.
Comparison should be treated as verification, not automatic calibration. A nearby weather app, airport station, or neighboring personal station may be at a different elevation and exposure. A sheltered backyard can genuinely report less wind than an exposed ridge, and a rooftop sensor can experience turbulence that does not appear at ground level.
If the cups barely move while nearby trees are swaying, inspect for shielding, blockage, mechanical resistance, and communication delays. If the wind direction repeatedly points toward one structure regardless of changing conditions, look for deflection from a wall, roof, fence, or tree before changing any calibration setting. Placement problems should be corrected at the installation site rather than hidden with an offset.
When the Ideal Location Is Not Available
Few residential properties provide a perfectly open observing site. A sensible compromise usually favors the clearest airflow that can be mounted safely and maintained easily. Document the nearby obstructions and keep the limitation in mind when interpreting calm readings, gusts, and wind direction.
If wind data is the main purpose of the station, a modular system may offer more flexibility because the anemometer can be mounted separately from temperature, humidity, or rainfall sensors, where the equipment supports separate placement. With an integrated array, prioritize a balanced site rather than improving wind exposure at the cost of severe shading, roof heat, runoff, or inaccessible maintenance.
The strongest installation is the one that gives the anemometer stable support, useful exposure, reliable communication, and safe access. A carefully chosen residential location may not match a formal observing site, but it can still produce valuable local wind information when its surroundings and limitations are understood.