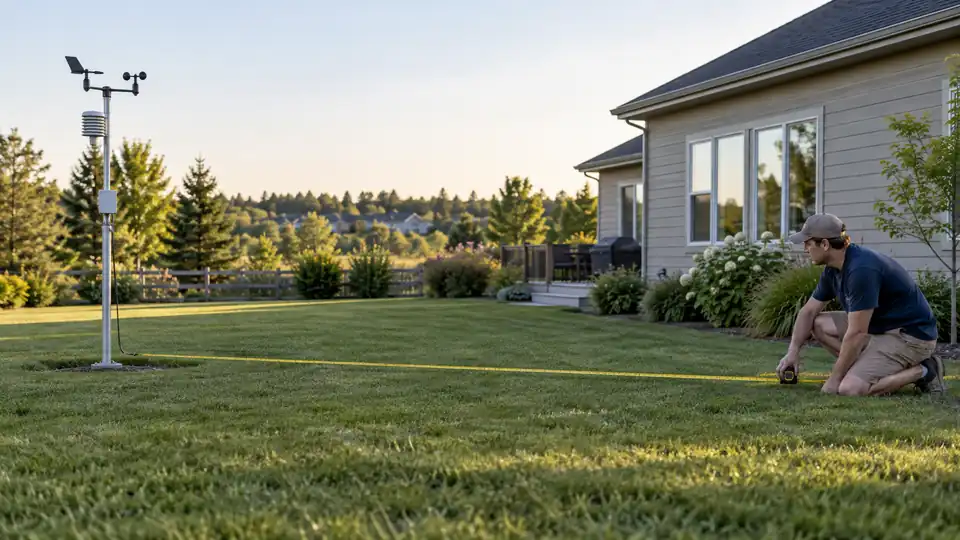
There is no single house-to-station distance that works for every weather station. The right separation depends on which measurement matters most and how the house affects airflow, shade, heat, and rainfall. As a practical starting point, place the outdoor sensor array as far from the house as your property, mounting method, and wireless connection allow. A location several feet from a wall may be acceptable for basic temperature monitoring, while reliable wind measurements usually require much more open space.
A sensor mounted beside a sun-warmed exterior wall can report air that is hotter than the surrounding yard. An anemometer tucked behind the same wall may show weak, erratic wind because the building blocks and redirects airflow. The station can be functioning correctly while the location produces misleading readings, so distance is really an exposure question.
How Far Should a Weather Station Be From a House?
For most residential installations, avoid placing the outdoor sensor directly against the house, under an eave, beside a vent, or on a wall that receives strong sun. Move the station into the most open part of the property that remains safe, stable, accessible, and within the sensor’s stated communication range.
For temperature and humidity, separation from the house helps reduce heat from siding, masonry, windows, roofs, air-conditioning equipment, and other surfaces. For rainfall, the main concern is whether the building blocks precipitation or creates splash and runoff. For wind, the house is a major obstruction, so greater distance and height generally matter more than they do for the other sensors.
A small backyard may force a compromise. A station 12 feet from the house in an open side yard can produce more useful temperature data than one mounted three feet from a wall, while a large property may allow the array to be placed much farther away. The best location is the one that reduces the dominant source of interference for the measurements you care about.
Distance Depends on the Sensor
| Sensor or measurement | Why the house matters | Practical placement aim |
|---|---|---|
| Temperature and humidity | Walls, roofs, pavement, windows, vents, and equipment can add heat or alter airflow. | Use a shaded, ventilated location away from walls and artificial heat sources. |
| Rain gauge | The house can block rainfall, create runoff, or cause splash and turbulence near the collector. | Place the gauge in an open area with a clear view of the sky and a level mounting surface. |
| Anemometer | The building changes wind speed and direction, producing turbulence and sheltered readings. | Give the wind sensor the most open exposure available, with separation measured in relation to the house’s height. |
| Integrated sensor array | Wind, rain, temperature, and humidity have different exposure needs. | Choose the best overall compromise, then recognize which readings remain most affected. |
Temperature and humidity sensors
A temperature sensor should measure moving outdoor air rather than heat radiating from the house. Brick, concrete, dark siding, roofing, and paved surfaces can warm in sunlight and release that heat after sunset. An outdoor sensor placed beside a south-facing wall may therefore show a different temperature from one positioned in a shaded, ventilated part of the yard.
Keep the sensor away from dryer vents, furnace outlets, air-conditioning condensers, kitchen exhaust, windows, vehicle parking areas, and dense ground-level vegetation. A shaded location several feet from the house is often more useful than a fully exposed location pressed against a bright wall, although the exact distance depends on the property’s surfaces and airflow.
If the sensor must be near the house, choose the cooler and more ventilated side, keep it clear of eaves and vents, and use the radiation shield or mounting arrangement specified for that model. A reading that consistently runs high during sunny afternoons may indicate placement bias rather than a calibration problem.
Rain gauges
Rain gauges need open exposure, but their ideal location may differ from the best location for a wind sensor. A house can shelter the collector from rain arriving at an angle, while roof edges can send concentrated drips into the gauge. Walls and hard surfaces can also bounce droplets into the collector, inflating the measured total.
Place the gauge away from roof runoff, gutters, overhanging branches, fences, and nearby structures. Keep it level and clear of objects that block the sky. A gauge several feet from a house may still be affected if it sits beneath an eave or beside a tall wall, while a slightly more distant location with open exposure can perform better.
Rainfall readings also depend on the type of precipitation. A standard home rain gauge may not measure snow, sleet, or freezing precipitation the same way it measures liquid rain. Moving the gauge away from the house improves exposure, but it does not automatically make frozen-precipitation measurements reliable.
Anemometers
Wind is usually the measurement most affected by a house. Air approaching a building can split around the sides, accelerate over the roof, or form swirling eddies behind the structure. An anemometer mounted beside a wall may report a low average wind speed, irregular direction, or brief gusts that reflect the building’s turbulence rather than the broader wind.
For wind monitoring, think in terms of the house’s height rather than a fixed number of feet. A sensor a short distance from a single-story wall may still be sheltered, while a sensor positioned several building heights away in an open area can have much cleaner exposure. Formal observing sites seek substantially greater clearance than most residential properties can provide, so a home installation often involves a practical compromise.
Raising an anemometer above the roofline can improve exposure in some installations, but a roof is not automatically a clean wind site. Roof edges, ridges, chimneys, solar panels, and nearby structures create turbulence. A higher position may also place an integrated temperature and rain sensor in a less representative location, which is why the entire array should be evaluated rather than the wind cup alone.
House Features That Require Extra Separation
Distance from the main wall is only part of the placement decision. A station can be far from the wall yet still sit in a pocket of altered air created by the roof, a fence, a shed, a row of trees, or a paved patio. Walk around the proposed location and identify anything taller or warmer than the surrounding ground before mounting the equipment.
- Roof edges and eaves: These can block rain, create falling water, and redirect wind.
- Walls and windows: Masonry, siding, and sunlit glass can radiate heat toward a temperature sensor.
- Vents and equipment: Exhaust outlets, dryer vents, heat pumps, and generators can alter temperature and humidity.
- Pavement and decks: These surfaces can store solar heat and release it around the sensor.
- Fences and sheds: They can shelter wind and create turbulence much like a house, although on a smaller scale.
- Trees and shrubs: Vegetation can block rain, disturb airflow, and grow into the sensor’s exposure area.
- Metal structures: Siding, roofing, gutters, and outbuildings may affect radio communication as well as measurement exposure.
Picture two common installations. One array sits 15 feet from the house but under a broad roof overhang, while another sits 10 feet away in an open side yard with no overhead obstruction. The second location may provide better rainfall and temperature data despite being closer, showing why the tape measure alone cannot settle the decision.
Wireless Range Can Limit the Best Location
The most open measurement site is useful only if the outdoor sensor can communicate reliably with its console or gateway. The sensor-to-console link is separate from Wi-Fi. A station may use a local radio connection between the outdoor array and indoor console, while the console or gateway separately connects to the home’s Wi-Fi network for app or Internet access.
Walls, floors, metal siding, reinforced construction, trees, terrain, and the placement of both devices can weaken the sensor link. A distant backyard location may therefore produce intermittent or stale readings even though the sensor itself has power. Check the exact model’s stated transmission range, then treat that figure as a best-case specification rather than a guarantee through a particular house.
Test communication from the intended mounting area before permanently attaching the array. Watch for missing updates, repeated dashes, or readings that stop and resume as the sensor moves. If the open location fails but a nearer site works, decide whether the improved exposure is worth using a different console position, gateway arrangement, or model-supported extension option.
Choosing a Practical Location
Use this sequence before drilling, pouring a post, or tightening mounting hardware:
- Identify the priority measurement. Decide whether local temperature, rainfall, wind, or a balanced combination matters most.
- Map the obstructions. Mark the house, roof edges, sheds, fences, trees, pavement, vents, and other nearby influences.
- Find the most open safe area. Favor stable ground or a sound mounting point that can be reached for battery changes and cleaning.
- Keep the array clear of direct heat sources. Avoid sunlit walls, roofs, exhaust outlets, condensers, and surfaces that store heat.
- Check rain and wind exposure separately. Make sure the rain collector is clear of runoff and the anemometer is not trapped in the house’s wind shadow.
- Test the communication link. Confirm that the outdoor sensor reaches the console or gateway from the planned location.
- Review the model’s instructions. Follow any sensor-specific mounting, clearance, power, or communication requirements supplied for that station.
A location that passes the first inspection can still reveal problems after installation. Compare temperature behavior between sunny and cloudy periods, look for water entering the gauge from a roof edge, and watch whether wind direction remains fixed whenever air moves across the house. These clues help separate a placement issue from a sensor or communication fault.
When the House Is the Only Practical Mounting Point
Some properties have no open yard, and a wall or roof may be the only realistic option. Wall mounting can work for a compact temperature and humidity sensor if it is shaded, ventilated, and separated from vents and heat-producing surfaces. It is usually a weaker choice for wind measurement because the wall changes the airflow immediately around the anemometer.
Roof mounting can provide more wind exposure than a low wall mount, but roof materials may heat the temperature sensor and roof geometry can disturb airflow. Maintenance and access matter too. A location that looks excellent from the ground may be difficult to reach safely after ice, debris, battery failure, or a blocked rain collector.
For an integrated array, decide which compromise causes the least harm to your intended use. If local temperature and rainfall matter most, a shaded open yard may be preferable to a highly exposed roof. If wind observation is the priority, a carefully selected elevated mount may be worth the added installation difficulty, provided the complete system remains stable and serviceable.
Signs the Station Is Too Close to the House
Placement problems often appear as patterns rather than one strange reading. A temperature sensor that rises sharply on sunny afternoons, stays warm after sunset, or differs greatly from a shaded nearby reference may be receiving heat from a wall or roof. A rain gauge that reports unusually high totals near a gutter or unusually low totals beside a wall may have an exposure or splash problem.
Wind readings can be harder to interpret. A fixed wind direction, long periods of calm during visibly breezy conditions, or sudden bursts as air moves around a corner can all point to obstruction. These symptoms do not prove that the instrument is defective, so moving the sensor to a more open temporary location can be a useful verification step before changing calibration settings or replacing hardware.
If the station communicates reliably and the readings respond to weather changes but remain biased in a predictable way, placement deserves attention first. Relocating the outdoor array may improve the data more effectively than adjusting an offset, especially because a calibration correction made for one sunny or windy location may become wrong after the sensor is moved.