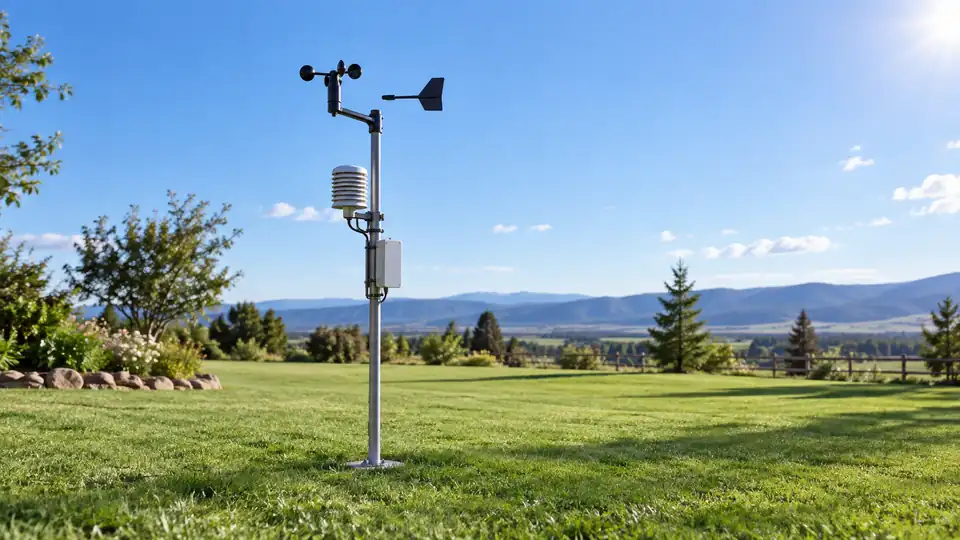
A weather station can be perfectly functional and still report misleading conditions if it sits beside a hot wall, beneath a tree, or in a pocket of turbulent air. A temperature sensor near siding may absorb reflected heat, while a rain gauge under branches can miss part of a shower. The best location depends on the measurement each sensor makes, so where to place a weather station requires balancing exposure, stability, wireless communication, safety, and access for maintenance.
Start With the Measurements
Before choosing a mounting point, separate the station into its individual sensors. Outdoor air temperature and humidity need shaded, ventilated exposure. A rain gauge needs a clear collection area with minimal splash and obstruction. An anemometer needs open airflow. These requirements can point to different parts of the property, which becomes especially important with an integrated all-in-one sensor array.
| Measurement | Main placement concern | Common source of error |
|---|---|---|
| Temperature and humidity | Representative air exposure, shade, and ventilation | Sunlight, walls, roofs, pavement, vents, and nearby equipment |
| Rainfall | Clear exposure, level mounting, and protection from splash | Trees, roofs, gutters, debris, runoff, and surrounding structures |
| Wind speed and direction | Open airflow above or away from obstructions | Buildings, fences, trees, roof edges, and turbulence |
| Barometric pressure | Stable installation and correct pressure configuration | Incorrect elevation or pressure reference settings |
| UV or solar sensors | Unobstructed exposure to the sky | Shade from buildings, branches, poles, or the sensor assembly itself |
Imagine two temperature sensors, one mounted above dark asphalt and another positioned over grass in a ventilated shelter. Both may be working correctly, yet the first can run warmer because the surrounding surface heats the air nearby. That difference is a placement issue, not automatic proof of a defective sensor, and it shapes the rest of the installation.
Where to Place the Outdoor Sensor Array
For a combined sensor array, look for the most open, representative location available without creating an unsafe or unstable installation. A freestanding mast in an open section of the yard often gives better exposure than a wall, fence, or roof edge, but property size, trees, nearby buildings, and wireless communication may limit the choices.
Keep the array away from obvious artificial heat sources. Walls, chimneys, dryer vents, air-conditioning equipment, generators, vehicles, outdoor lighting, and paved surfaces can all affect nearby air temperature. A spot that feels convenient beside the back door may produce less representative readings than a slightly farther location with better airflow and less stored heat.
Consider the ground surface as well. Grass or natural ground usually creates a different microclimate from concrete, gravel, decking, or a dark roof. A sensor above pavement may react to heat released after sunshine, while one near dense vegetation may experience extra moisture and restricted airflow. Neither location represents the entire property, so choose the setting that best matches the conditions you want to monitor.
Temperature and Humidity Placement
Outdoor temperature and humidity sensors should have ventilation while remaining protected from direct solar heating. A shaded location with free air movement is generally preferable to a sealed box, enclosed porch, or narrow space between a wall and fence. Many stations include a radiation shield or a ventilated sensor housing, but that component cannot remove every problem caused by poor surroundings.
A sensor mounted against a south-facing wall can warm rapidly after sunlight reaches the siding. A sensor beneath a roof overhang may stay cooler or wetter than the surrounding yard, depending on airflow and shade. Place the sensor where air can move around it and keep it clear of surfaces that radiate or conduct heat.
Rain Gauge Placement
Rain gauges need a clear view of falling precipitation. Overhanging branches, gutters, rooflines, balconies, and nearby walls can block rain or redirect water into the collector. Leaves, pollen, insects, and small debris may also obstruct the funnel or tipping mechanism, so a location that is easy to inspect has a practical advantage.
Keep the gauge level and away from surfaces that can send splashing water into the collector. A gauge beside a shed may receive runoff from the roof, while one near a paved path can collect bounced droplets during a heavy shower. If the station includes a rain gauge in the same array as the wind and temperature sensors, the most open wind location may still need evaluation for splash, access, and obstruction.
Standard rain gauges are intended for liquid precipitation measurements supported by their design. Do not assume that a standard collector measures snow, sleet, or freezing precipitation accurately unless the equipment documentation specifically explains how those conditions are handled.
Wind Sensor Placement
Wind is especially sensitive to nearby objects. Buildings, fences, trees, terrain, roof geometry, and even a neighboring structure can slow, redirect, or swirl the airflow. An anemometer beside a house may record the wind arriving at that corner rather than the broader wind passing over the property.
Raising an anemometer can improve exposure, but it may create new compromises for an integrated array. A taller mast can make the wind sensor more representative while placing the rain gauge farther from convenient maintenance access and making the temperature sensor harder to inspect. Greater height also increases installation difficulty and may require model-specific mounting hardware.
A roof can provide open exposure, but it does not guarantee clean wind readings. Air flowing over a roof can accelerate near an edge and become turbulent around ridges, chimneys, vents, and adjacent structures. Roofing materials can also contribute heat near temperature sensors. Roof installation may work well for a particular property, but the mounting point should be selected with these effects in mind rather than treated as automatically ideal.
Buildings, Trees, and Other Obstructions
Obstructions affect different sensors in different ways. A tree can shade a temperature sensor, intercept rain, and disturb wind. A fence may have little effect on a sheltered humidity reading but create a noticeable wind shadow. A building can block precipitation from one direction while producing turbulence around the roofline.
Walk around the proposed site and observe how the surroundings change with the sun, prevailing weather, and seasons. A bare winter tree may become a dense summer canopy. A low afternoon sun can reach a sensor that appears shaded at midday. A new growth season, full planter, or stored vehicle can gradually turn a previously open location into a small pocket of altered air.
Use the clearest location available for rainfall and wind, then check whether that position creates an unacceptable temperature compromise. If the station is modular, separate sensors may allow a better match between each measurement and its exposure. If the station is an all-in-one unit, accept that one mounting point may be a practical compromise rather than a perfect setting for every sensor.
Height, Mounting Surface, and Stability
There is no single mounting height that is ideal for every weather station and every property. Height affects wind exposure, temperature representation, rain collection, maintenance, wireless communication, and physical safety. Follow the exact mounting requirements supplied for the model, then assess how the proposed height interacts with nearby structures and surfaces.
A low mount may be easy to reach but can sit in the disturbed airflow around a fence or shrub. A high mast may improve wind exposure but become difficult to inspect after a storm. A wall mount can simplify installation while placing the array close to siding, roof edges, or other heat and airflow influences.
The mounting point should remain stable and reasonably level. Movement can affect wind direction, rain collection, and the long-term position of the sensors. Confirm that the bracket, pole, clamp, or tripod matches the station’s mounting design and the installation surface. Hardware compatibility is model-specific, so a generic pole should not be assumed to fit every array.
Roof work, elevated masts, ladders, and installations near electrical conductors carry real risks. Avoid working in rain, strong wind, or storm conditions, and use professional help for difficult structural or electrical work. Follow the manufacturer’s instructions and applicable local requirements for grounding, mast installation, and related electrical concerns.
Wireless Communication and Access
A sensor array may communicate wirelessly with an indoor console without using Wi-Fi. Wi-Fi usually applies to the console or gateway connecting to a home network, while the outdoor sensor may use a separate radio link. A site can therefore offer excellent sensor-to-console communication while the console has weak Wi-Fi, or the reverse.
Place the outdoor array where it has the exposure it needs, then test the communication path before finalizing the installation. Walls, floors, metal siding, reinforced construction, trees, terrain, and interference can affect the connection. The advertised transmission range is a stated specification, not a guarantee for every property.
An indoor console or gateway may need a suitable outlet, network signal, and a location where its display remains useful. If remote access depends on an app, account, gateway, cloud service, or particular network configuration, verify those requirements for the exact station. Wireless sensor communication by itself does not provide Internet access.
A Practical Placement Process
- List the sensors. Identify which components measure temperature, humidity, rainfall, wind, pressure, UV, solar radiation, or other conditions.
- Mark problem areas. Note walls, roofs, pavement, vents, HVAC equipment, trees, fences, gutters, and locations that collect runoff or splash.
- Compare possible sites. Look for shade and ventilation for temperature, open sky for rain, and unobstructed airflow for wind.
- Check physical access. Make sure batteries, collectors, moving parts, and mounting hardware can be inspected without excessive risk.
- Check communication. Confirm the sensor link to the console or receiver, then check Wi-Fi or Internet access separately if the system supports it.
- Secure and level the installation. Use compatible hardware and verify that the array does not shift, lean, or rotate after mounting.
- Review the readings. Watch for patterns that suggest placement influence, such as unusually warm afternoons near a wall, low rainfall beside an overhang, or weak wind in a sheltered corner.
That final review can reveal a problem that a quick installation check misses. For example, a rain gauge may communicate normally yet undercount showers because a branch blocks one approach, while an anemometer may report plausible values that remain consistently low beside a fence. Communication confirms that data is arriving, not that the exposure is representative.
How to Judge a Compromised Location
A residential station rarely matches the exposure of a formal observing site. Limited space, property lines, trees, roof access, safety concerns, and integrated sensor designs often require compromise. That does not make the station useless. It means the readings describe conditions at that particular installation, and the limitations should be understood before comparing them with an airport, weather app, or another station.
If temperature is the main purpose, prioritize shade, ventilation, and distance from artificial heat. If rainfall matters most, give the collector clear exposure, level support, and protection from splash and debris. If wind data is the priority, favor open airflow while accepting that a higher or more exposed position may require more difficult maintenance. Choosing the dominant measurement helps resolve conflicts that a single universal placement rule cannot.
After installation, keep a simple record of the location, mounting arrangement, nearby obstructions, and any settings that affect interpretation. Recheck the site after seasonal growth, construction, major storms, or a change in the surrounding yard. A small shift in a branch, roof obstruction, or mounting angle can change the readings long before the station reports an obvious fault.