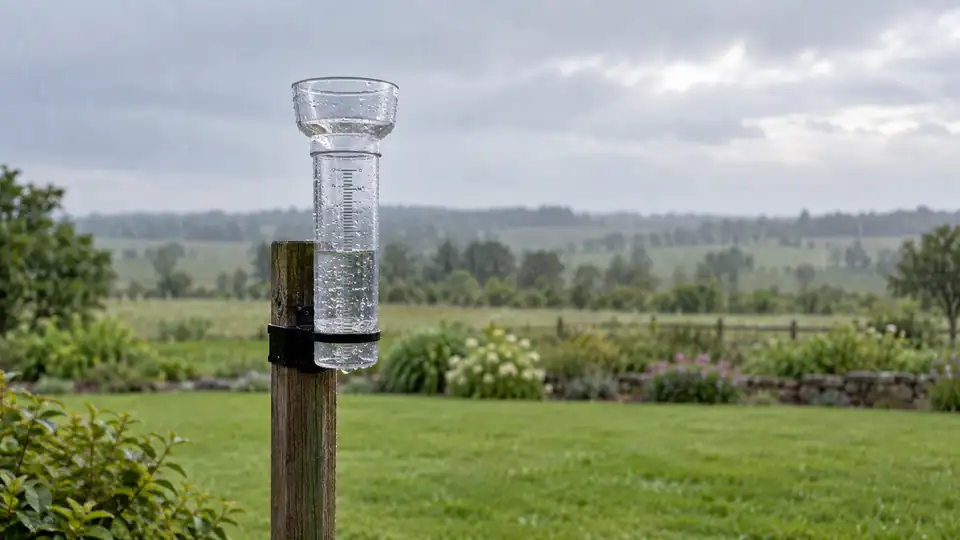
A rain gauge should sit in an open, level location where falling precipitation can enter the collector without being blocked, redirected, or contaminated. The best position is usually a clear part of the yard, away from roofs, walls, fences, trees, gutters, sprinklers, and hard surfaces that can bounce water into the funnel.
That sounds simple until a seemingly open spot turns out to sit beneath a maple branch or beside a shed. A gauge there may record less rain because foliage intercepts drops, or more rain because runoff splashes from the roof. Placement determines whether the number on the display represents rainfall at your property or a curious mixture of rain, drips, and splash.
Choose an Open, Level Location
Start with the clearest area available, ideally where the gauge has an unobstructed view of the sky. The collector needs exposure from every direction because rain rarely falls straight down. Wind can push drops sideways, and nearby objects can create turbulence that changes how much precipitation reaches the opening.
A level patch of short grass is often more suitable than a patio, driveway, or bare soil. Grass helps reduce bouncing drops and avoids the hard-surface runoff that can make a gauge report an exaggerated total. If the only available space is beside a garden, keep the collector above plants that could brush the funnel or shed water into it.
Place the gauge so its opening is horizontal. A slight tilt can send water toward one side of the collector, affect the tipping mechanism, or leave some water behind. Integrated outdoor arrays should be checked with a small level after mounting, since a pole that looks upright can still leave the rain collector angled.
Keep Obstructions Away From the Collector
Buildings, fences, trees, shrubs, and walls can block rain or redirect it. The taller and closer the obstruction, the more likely it is to affect the catch. A useful residential guideline is to keep the gauge at least roughly twice the obstruction’s height away whenever the property allows. Greater separation is preferable, especially for large trees and broad structures, but the exact arrangement depends on the site and the manufacturer’s instructions.
| Nearby feature | How it can affect rainfall | Better placement choice |
|---|---|---|
| Roof or gutter | Creates runoff, drips, and splash that can enter the collector | Move the gauge beyond the roof’s drip line and away from downspouts |
| Tree or shrub | Leaves intercept rain, then release delayed drips | Use an open area clear of overhanging branches |
| Fence or wall | Blocks wind-driven rain and creates turbulent airflow | Increase separation or choose the more exposed side of the property |
| Driveway or patio | Splashes water upward and can collect runoff | Prefer grass or another low-splash surface |
| Sloped ground | Allows water to flow toward the gauge | Use level ground above nearby drainage paths |
A gauge mounted beside a fence may appear to have plenty of sky above it, yet the fence can still shield wind-driven rain from one direction. A collector beneath a tree can behave differently during a light shower than during a downpour, since leaves may hold water and release it after the rain has stopped. Those delayed drops are a classic source of inflated totals.
Why Roofs and Decks Often Create Problems
Roofs are convenient mounting points, but they can be troublesome for rainfall measurement. Water rolling off shingles, metal, or flashing may leap into the collector. Wind can carry spray from the roof edge, while gutters and downspouts create concentrated streams that bear little resemblance to rainfall falling directly from the sky.
A deck or balcony has similar problems if the gauge sits above or beside a railing, roof edge, or hard flooring. Rain striking the boards or concrete can rebound into the funnel. If a raised location is unavoidable, inspect it during a storm from a safe position and look for drips, splash, and runoff paths. Do not climb onto a wet roof to check a sensor.
Roof installation can still be practical for an integrated weather station, particularly where ground space is limited. In that case, keep the rain collector away from roof edges and drainage points, follow the mounting instructions for the exact model, and recognize that a roof location may involve compromises for rainfall and other sensors.
Integrated Weather Stations Require a Compromise
Many personal weather stations combine the rain gauge, anemometer, wind vane, temperature sensor, and humidity sensor in one outdoor assembly. That arrangement simplifies installation, but every measurement has different exposure needs. Wind instruments benefit from clear airflow, while the rain collector needs an open catch area and the temperature sensor needs protection from direct solar heating and nearby warm surfaces.
Do not move an all-in-one array to an exposed roof simply to improve wind readings if the roof causes rain splash or heats the temperature sensor. Likewise, a shaded corner beneath trees may appear attractive for temperature readings but can badly compromise rainfall. The most useful location is the one that gives the measurements you care about a reasonable balance, rather than perfect exposure for one sensor at the expense of the rest.
A modular system gives you more freedom because a separate rain gauge can occupy an open garden area while the anemometer is mounted elsewhere. Whether that is possible depends on the equipment’s sensor architecture, communication method, power arrangement, and supported components. Check the exact documentation before assuming sensors can be separated or paired across product generations.
Install the Rain Gauge in the Right Sequence
- Read the model-specific instructions. Check whether the manufacturer specifies a mounting orientation, minimum clearance, pole arrangement, or location requirement. Rain-gauge mechanisms differ, particularly between manual collectors, tipping-bucket gauges, and integrated arrays.
- Survey the property during different conditions. Look for tree cover, roof drip lines, irrigation spray, drainage paths, fences, and areas where wind-driven rain is likely to be blocked. A location that looks open on a calm afternoon may be poorly exposed during a storm.
- Select the clearest practical site. Favor open ground with short vegetation and enough space around the collector. Keep it away from overhanging branches, walls, downspouts, and hard surfaces that can create splash.
- Mount or set the gauge level. Use the supplied hardware where applicable, tighten fasteners without damaging the housing, and verify that the collector opening is horizontal. A leaning pole can produce a leaning gauge.
- Check for false water paths. Look beneath nearby roofs, branches, gutters, and elevated platforms. Water should reach the collector from the sky, not from a surface or object above it.
- Confirm the reading after rainfall. Check that the gauge reports rainfall, the total resets or accumulates as expected for the model, and the collector is free of leaves and standing debris. A single storm check can reveal a surprising amount about the installation.
For a manual gauge, read the scale at eye level and empty it according to its instructions. For a tipping-bucket model, rainfall is recorded through repeated internal bucket movements, so the collector must remain level and the mechanism must stay clear. The displayed rainfall total may be calculated from those events, while rainfall rate may be derived from the timing of the events rather than measured by a separate sensor.
Placement Problems That Distort Rainfall
Small differences between a personal gauge and a nearby weather service do not automatically indicate a fault. A storm can drop heavy rain on one side of a neighborhood and much less on the other, especially when showers are localized. Different gauge heights, nearby obstructions, and observation times can also produce different totals.
| What you observe | Possible placement issue | What to inspect |
|---|---|---|
| Rain total seems unusually high | Roof runoff, splash, gutter drips, or sprinkler spray | Look above and around the collector for alternate water sources |
| Rain total seems unusually low | Tree cover, fence shielding, building turbulence, or a blocked funnel | Check overhead branches, nearby obstructions, and the collector opening |
| Rain continues to appear after the storm | Water held by leaves, roof edges, or the gauge housing | Watch for delayed drips and inspect the area during light rain |
| One storm produces an implausible spike | Debris, tipping mechanism interference, or concentrated runoff | Clean the collector gently and check that the gauge remains level |
| No rain is recorded | No qualifying precipitation reached the collector, or the mechanism is blocked | Check the funnel, tipping section, battery condition, and sensor communication |
A low total after a windy storm often points toward exposure rather than electronics. A nearby wall may shelter the gauge from wind-driven rain, while a tall hedge can intercept drops before they reach the collector. A high total near a garage may come from water bouncing off siding or dripping from the roof edge, especially during intense rain.
Snow, Sleet, and Debris Need Extra Care
Standard consumer rain gauges are generally intended to measure liquid precipitation. Snow, sleet, freezing rain, and hail may collect differently, block the funnel, bounce out, or fail to pass through the mechanism as intended. Do not assume that a displayed rainfall total converts snow depth into liquid precipitation unless the equipment specifically supports that function.
Leaves, seeds, insects, and small twigs can obstruct a funnel or interfere with a tipping bucket. Inspect the collector periodically, particularly after windy weather and during seasons when trees shed debris. Remove loose material gently and follow the model’s cleaning instructions. Avoid poking the mechanism, spraying it with high pressure, applying lubricant, or opening the housing unless the documentation specifically permits those actions.
After cleaning or relocating the gauge, verify that it is level, firmly mounted, and communicating with the console or gateway. If the sensor uses a wireless link, a good indoor display connection does not prove that the rain gauge is well placed, and Wi-Fi or Internet access is a separate issue from sensor-to-console communication.
A Practical Test for the Finished Location
Stand back from the gauge and inspect the full area rather than looking only at the collector. Ask whether branches, roofs, fences, walls, vehicles, irrigation heads, or sloping surfaces could alter the water path. Then check the level and watch the site during the next meaningful rainfall from a safe location.
The finished installation should collect water that falls into the opening from the surrounding sky. It should not rely on a roof edge, gutter, tree branch, railing, or paved surface to direct water into the funnel. If the readings remain suspicious, compare the exposure first, then inspect the collector and tipping mechanism before changing calibration settings or replacing hardware.